Analysis AWS: Difference between revisions
No edit summary |
No edit summary |
||
| (20 intermediate revisions by the same user not shown) | |||
| Line 4: | Line 4: | ||
== Accessing compute resources on AWS: == |
== Accessing compute resources on AWS: == |
||
Speak with Jeff Stout to get the current IP address and PEM key <br> |
Speak with Jeff Stout to get the current IP address and PEM key <br> |
||
<br> |
|||
chmod 400 AWS.pem |
|||
${PATH} is the path to the PEM key provided to you |
${PATH} is the path to the PEM key provided to you |
||
ssh -X -i |
ssh -X -i AWS.pem user1@ec2-3-230-155-59.compute-1.amazonaws.com |
||
'''Windows Laptops''' do not have X11 installed natively. Download an Xterm software for visualization. <br> |
|||
MobaXterm has been tested to work: https://mobaxterm.mobatek.net/download.html |
|||
== Jupyter Notebook Over a Remote Connection == |
== Jupyter Notebook Over a Remote Connection == |
||
1) Run one terminal to start the notebook: |
1) Run one terminal to start the notebook and forward the outputs to local web browser: |
||
ssh -i AWS.pem -L 8887:localhost:8887 ubuntu@IP_ADDRESS |
|||
ssh -Y $USER@$REMOTE_HOST |
|||
conda activate workshop |
|||
cd $FOLDER_WITH_CODE |
|||
#If necessary: conda activate $CONDA_ENV |
|||
jupyter notebook --no-browser --port=8887 |
jupyter notebook --no-browser --port=8887 |
||
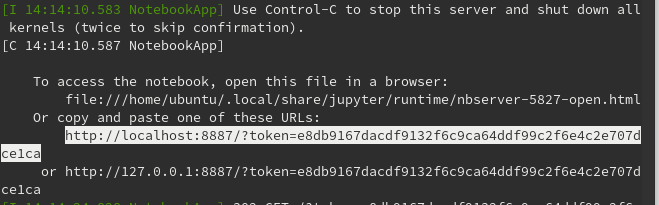
2) Copy the output of the jupyter notebook command (see example below) and enter into your laptop web browser (Firefox, Chrome, etc.). Do not click on the link - it will try to launch on the AWS computer |
|||
2) Run another terminal to forward the port to your local machine<br> |
|||
<em>(Replace User and Remote_Host with the appropriate username and ip-address)</em> |
|||
ssh -N -L localhost:8888:localhost:8887 $USER@$REMOTE_HOST |
|||
[[file:JupyterAws2.png]] |
|||
3) In Firefox/Chrome/Etc - Log into localhost:8888 <br> |
|||
This will prompt you for a token<br> |
|||
<br> |
|||
4) In the password/token column, copy the token created in the first terminal<br> |
|||
(It should look like the below - only copy the portion after the token= ) |
|||
http://localhost:8887/?token=####HERE_IS_THE_TOKEN_CODE---COPY_THIS_AND_PASTE_INTO_BROWSER |
|||
3) Use the jupyter notebook to analyze MEG data with python tools |
|||
'''Biowulf Jupyter Notebook Connection'''<br> |
|||
[[File:TestJupyter.png]] |
|||
1) Run one terminal to access the persistent biowulf node and start jupyter notebook: |
|||
#Connect to login node |
|||
ssh -Y $USER@biowulf.nih.gov |
|||
spersist #This will startup a persistent node |
|||
#Alternatively if a persistent node is already running, you can ssh into the persistent node |
|||
#In the persistent node |
|||
conda activate $CONDA_ENVIRONMENT_NAME |
|||
cd $FOLDER_WITH_CODE |
|||
jupyter notebook --no-browser --port=8887 |
|||
2) Run another terminal to forward the port to your local machine<br> |
|||
<em>(Replace User and Remote_Host with the appropriate username and ip-address)</em> |
|||
<em>(This is a two step process, the notebook port is sent to biowulf first, then to your local computer)</em> |
|||
ssh -L localhost:8888:localhost:8888 $USER@biowulf.nih.gov |
|||
#In the same ssh terminal from the line above this one, type the following |
|||
ssh -N -L localhost:8888:localhost:8887 $USER@$PERSISTENT_NODE |
|||
3) In Firefox/Chrome/Etc - Log into localhost:8888 <br> |
|||
This will prompt you for a token<br> |
|||
<br> |
<br> |
||
4) In the password/token column, copy the token created in the first terminal<br> |
|||
(It should look like the below - only copy the portion after the token= ) |
|||
http://localhost:8887/?token=####HERE_IS_THE_TOKEN_CODE---COPY_THIS_AND_PASTE_INTO_BROWSER |
|||
== Installed software == |
|||
'''Human Neocortical Neurosolver ''' <br> |
|||
HNN website: https://hnn.brown.edu/ |
|||
conda deactivate |
|||
''' Installed software ''' <br> |
|||
Human Neocortical Neurosolver |
|||
hnn |
hnn |
||
#hnn is installed in the system level python >> may need to conda deactivate first |
|||
MNE python, Eelbrain, PyCTF |
'''MNE python, Eelbrain, PyCTF''' <br> |
||
MNE website: https://mne.tools/stable/index.html <br> |
|||
conda activate workshop (This environment has MNE, Eelbrain, and PyCtf installed) |
|||
Eelbrain website: https://eelbrain.readthedocs.io/en/stable/ <br> |
|||
PyCTF website: https://megcore.nih.gov/index.php/MEG_Software_and_Analysis#MEG_Core_pyctf_tools_ported_to_Python_3 <br> |
|||
conda activate workshop # This conda environment has the MNE, Eelbrain, and PyCtf toolboxes installed |
|||
ipython |
|||
import eelbrain, mne, pyctf |
|||
CTF software |
'''CTF software''' |
||
singularity shell /opt/ctf/ctf.img |
singularity shell /opt/ctf/ctf.img |
||
$ctf_command |
$ctf_command |
||
| Line 70: | Line 47: | ||
singularity exec /opt/ctf/ctf.img $ctf_command |
singularity exec /opt/ctf/ctf.img $ctf_command |
||
SAM version 5 |
'''SAM version 5''' |
||
sam_cov ... |
sam_cov ... |
||
sam_3d ... |
sam_3d ... |
||
Afni |
'''Afni''' |
||
afni -dset $MRI_file |
afni -dset $MRI_file |
||
# Server Config |
|||
## google > fedora aws > select the AMI number for N.Virginia |
|||
## In AWS > launch instance > search for AMI number > (Under community) > Launch |
|||
### https://alt.fedoraproject.org/cloud/ |
|||
#Determine an image (search for fedora in community) |
|||
#Create a keypair and download the key |
|||
##The download will be in the form of a .pem file |
|||
## We will need to distribute this key to the users |
|||
#Launch the instance |
|||
#Log into the instance using ssh |
|||
Conda installed |
|||
Conda deactivate >> hnn |
|||
Conda activate nih >> mne or eelbrain..... |
|||
# Freesurfer |
|||
# MNE python |
|||
# pyctf |
|||
Done # SAM v5 |
|||
# Afni ###INSTALL ME neurodebian |
|||
# singularity ? >> CTF (need to use workstation version of fedora) << may need to compile for ubuntu or use 2.6 |
|||
# Eelbrain (conda forge) |
|||
# Jupyter |
|||
Done# Forward sim HNN software |
|||
# FSL ###Install outside of neurodebian |
|||
# Brainstorm (compiled) |
|||
<br> |
|||
'''Matlab Based''' |
|||
# Brainstorm |
|||
# Fieldtrip |
|||
Latest revision as of 12:15, 7 November 2019
For Workshop members without access to computing resources - Preconfigured Amazon Web Services servers can be used
Accessing compute resources on AWS:
Speak with Jeff Stout to get the current IP address and PEM key
chmod 400 AWS.pem
${PATH} is the path to the PEM key provided to you
ssh -X -i AWS.pem user1@ec2-3-230-155-59.compute-1.amazonaws.com
Windows Laptops do not have X11 installed natively. Download an Xterm software for visualization.
MobaXterm has been tested to work: https://mobaxterm.mobatek.net/download.html
Jupyter Notebook Over a Remote Connection
1) Run one terminal to start the notebook and forward the outputs to local web browser:
 ssh -i AWS.pem -L 8887:localhost:8887  ubuntu@IP_ADDRESS
 conda activate workshop
 jupyter notebook --no-browser --port=8887
2) Copy the output of the jupyter notebook command (see example below) and enter into your laptop web browser (Firefox, Chrome, etc.). Do not click on the link - it will try to launch on the AWS computer

3) Use the jupyter notebook to analyze MEG data with python tools
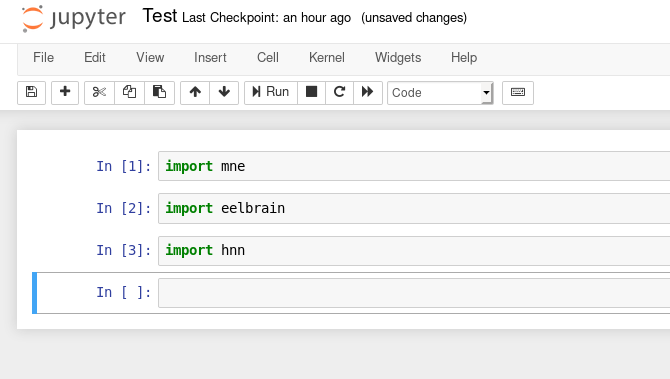

Installed software
Human Neocortical Neurosolver
HNN website: https://hnn.brown.edu/
 conda deactivate
 hnn
MNE python, Eelbrain, PyCTF
MNE website: https://mne.tools/stable/index.html
Eelbrain website: https://eelbrain.readthedocs.io/en/stable/
PyCTF website: https://megcore.nih.gov/index.php/MEG_Software_and_Analysis#MEG_Core_pyctf_tools_ported_to_Python_3
 conda activate workshop  # This conda environment has the MNE, Eelbrain, and PyCtf toolboxes installed
 ipython
 import eelbrain, mne, pyctf
CTF software
 singularity shell /opt/ctf/ctf.img
 $ctf_command
singularity exec /opt/ctf/ctf.img $ctf_command
SAM version 5
 sam_cov ...
 sam_3d ...
Afni
afni -dset $MRI_file