Subject Preparation: Difference between revisions
No edit summary |
|||
| Line 27: | Line 27: | ||
<br> |
<br> |
||
==Head Size / Fit Test== |
==Head Size / Fit Test== |
||
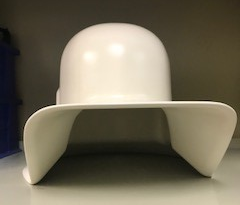
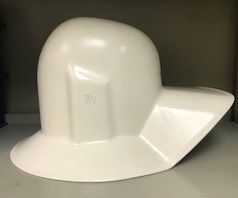
[[File:MEG_Sizing_Helmet_1_cropped.png|frameless|right|MEG Mock Helmet - Front View]] [[File:MEG_Sizing_Helmet_2_cropped.jpg|frameless|right| MEG Mock Helmet - Side View]] |
[[File:MEG_Sizing_Helmet_1_cropped.png|frameless|right|MEG Mock Helmet - Front View]] [[File:MEG_Sizing_Helmet_2_cropped.jpg|frameless|right| MEG Mock Helmet - Side View]] |
||
| Line 47: | Line 46: | ||
*Determine how the subject will fit inside the dewar helmet: |
*Determine how the subject will fit inside the dewar helmet: |
||
::– Place the MEG mock helmet along with a protective cap over the subject's head. |
::– Place the MEG mock helmet along with a protective cap over the subject's head. |
||
:::• ''Note the fit; if the helmet does not fit (with the coils on and inside the helmet) then the subject is not a good candidate for MEG |
:::• ''Note the fit; if the helmet does not fit (with the coils on and inside the helmet) then the subject is not a good candidate for MEG. If the subject fits then note the amount of space the subject has to move his/her head.'' |
||
::– Insert Pearltec Head Positioning pads to restrict head movement then re-try the helmet. Please instruct the participant to inflate the positioning pads to a comfortable level. Note: you want the helmet to be tight enough to restrict head movement but not so tight as to cause a headache. |
::– Insert Pearltec Head Positioning pads to restrict head movement then re-try the helmet. Please instruct the participant to inflate the positioning pads to a comfortable level. Note: you want the helmet to be tight enough to restrict head movement but not so tight as to cause a headache. |
||
*Determine how to place the subject's head properly - at the top the dewar helmet. |
*Determine how to place the subject's head properly - at the top the dewar helmet. |
||
::• ''Note how far down over the head the helmet comes as this will give you a general idea of how high up in the dewar the subject can go in order to position the subject's head at the top of the dewar (closest to the sensors at the top of the helmet) without covering the subject's eyes.'' |
::• ''Note how far down over the head the helmet comes as this will give you a general idea of how high up in the dewar the subject can go in order to position the subject's head at the top of the dewar (closest to the sensors at the top of the helmet) without covering the subject's eyes.'' |
||
<br> |
|||
==Fiducial Points / Head Coil Placements== |
==Fiducial Points / Head Coil Placements== |
||
| ⚫ | |||
Fiducial marker coils are used for head localization (the process of locating the subject’s head in space relative to the MEG dewar). The recorded locations are later used to co-register the MEG Head Coordinate System with the MRI Coordinate System for source space analysis.''' |
|||
'''Procedure:''' |
|||
<div style="text-align: center:">*If the subject has had previous digital pictures of the fiducial points retrieve images to match placement.</div> |
|||
*Place a small black dot <u>at 1.5cm up from the nasion (indentation between the forehead and the nose) midline</u>. *The dot may be placed slightly higher if the nasion curvature is such that it does not allow level placement of the head coil. |
|||
*Place a small black dot |
*Place a small black dot <u>midline, 1.5cm above from the nasion (indentation between the forehead and the nose)</u>. |
||
*Place a small black dot at the left & right preauricular points, <u>1.5cm from the tragus, on a line between the tragus and the outer canthus of the eye</u>. Measure for accuracy. |
|||
* |
*Record these positions with the Brainsight Neuronavigation unit (if proceeding with Brainsight coregistration. Otherwise, take a picture of these locations using the HP 715 Digital Camera, download and print the pictures. |
||
*Attach |
*Attach small adhesive washers to head localization coils. |
||
*Attach head localization coils at the fiducial marks. |
*Attach head localization coils at the fiducial marks. |
||
*Make sure the marks line up with the center of the head coils. |
*Make sure the marks line up with the center of the head coils. |
||
*Place tape over the cables to secure. |
*Place Transpore (medical) tape over the cables to secure. |
||
| ⚫ | |||
| ⚫ | |||
| ⚫ | |||
| ⚫ | |||
|- |
|- |
||
| ⚫ | |||
| <gallery> |
|||
| ⚫ | |||
</gallery> |
|||
|} |
|||
| ⚫ | |||
::::{| class="wikitable" |
|||
|- |
|- |
||
| ⚫ | |||
| ⚫ | |||
|- |
|||
| ⚫ | |||
|} |
|} |
||
| ⚫ | |||
<br> |
<br> |
||
== Subject Preparation: Additional Procedures == |
== Subject Preparation: Additional Procedures == |
||
*[[Brainsight Coregistration| Brainsight Coregistration]] |
*[[Brainsight Coregistration| Brainsight Coregistration]] |
||
Revision as of 19:43, 19 January 2022
Subject Preparation: De-metaling
Before entering the MSR (Magnetically Shielded Room) subjects must remove any metal from their person.
There are no known risks associated with MEG recordings. Although wearing metal objects while in the MSR is not harmful to the individual, bringing metallic or magnetic objects into the MSR causes interference and high noise levels in the recording.
Please use the MEG Screening Questionnaire when scheduling participants.
It is recommended that subject are screened and given instructions before arriving for testing. However, if subjects arrive with metal on their clothing that can not be easily removed, they must change into scrubs, which are available for all participants in the NMR Center changing room.
All subjects must remove:
- Bras with metal underwires, clasps or hooks.
- Note: Some sports bras may have powder coated metal connections which look and feel like plastic. You can use the metal scanner in the NMR Center changing room to check any questionable elements.
- Makeup - mascara, eye liner, eye shadow
- Clothing containing metallic shiny threads or glitter
- Metal on clothing i.e., metal buttons, snaps or trimming
- Belts
- Keys
- Watches (both digital and analog)
- Rings or other jewelry
- Coins
- Eyeglasses
- Cell phones
- Airpods or other earbuds
- Pagers
- Credit Cards
- Small metal objects such as hair pins, paper clips, safety pins, etc.
Additionally, everyone entering the MSR must also remove their shoes or use protective booties to prevent magnetic dust from getting into the MSR.
Head Size / Fit Test


If the patient's head size is a concern, use a tape measure or the mock MEG helmet to determine whether:
- a) the subject will fit the MEG sensor helmet/dewar
- b) how much padding is needed to fill the excess space to prevent head movement
- c) how high up in the dewar helmet the subject can be raised for optimal placement.
The helmet/dewar will fit subjects up to about 59cm head circumference (within 98 percentile for head size). Note or record measurements.
| Head Circumference | Nasion to Inion | LPA to RPA (Preauricular Points) | |
|---|---|---|---|
| Gantry Limits | ≤ 59cm | ≤ 40cm | ≤ 40cm |
- Determine the participant's head size by measuring the:
- - Head Circumference
- - Distance from Nasion to Inion
- - Distance between LPA and RPA (the preauricular points)
- Determine how the subject will fit inside the dewar helmet:
- – Place the MEG mock helmet along with a protective cap over the subject's head.
- • Note the fit; if the helmet does not fit (with the coils on and inside the helmet) then the subject is not a good candidate for MEG. If the subject fits then note the amount of space the subject has to move his/her head.
- – Insert Pearltec Head Positioning pads to restrict head movement then re-try the helmet. Please instruct the participant to inflate the positioning pads to a comfortable level. Note: you want the helmet to be tight enough to restrict head movement but not so tight as to cause a headache.
- – Place the MEG mock helmet along with a protective cap over the subject's head.
- Determine how to place the subject's head properly - at the top the dewar helmet.
- • Note how far down over the head the helmet comes as this will give you a general idea of how high up in the dewar the subject can go in order to position the subject's head at the top of the dewar (closest to the sensors at the top of the helmet) without covering the subject's eyes.
Fiducial Points / Head Coil Placements

Fiducial marker coils are used for head localization (the process of locating the subject’s head in space relative to the MEG dewar). The recorded locations are later used to co-register the MEG Head Coordinate System with the MRI Coordinate System for source space analysis.
Procedure:
- Place a small black dot midline, 1.5cm above from the nasion (indentation between the forehead and the nose).
- Place a small black dot at the left & right preauricular points, 1.5cm from the tragus, on a line between the tragus and the outer canthus of the eye. Measure for accuracy.
- Record these positions with the Brainsight Neuronavigation unit (if proceeding with Brainsight coregistration. Otherwise, take a picture of these locations using the HP 715 Digital Camera, download and print the pictures.
- Attach small adhesive washers to head localization coils.
- Attach head localization coils at the fiducial marks.
- Make sure the marks line up with the center of the head coils.
- Place Transpore (medical) tape over the cables to secure.
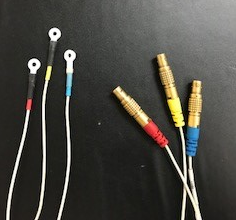
Head Coil Locations
- *Note: Color coding system may change, dependent on replacement coil supply; all changes will be posted in the MEG Lab for reference.
Right Ear Nasion Left Ear Red or Yellow Blue Green